How to Watch Amazon Prime USA Abroad With a VPN
Our step-by-step guide shows you how to easily unblock US-only Amazon Prime content. You’ll learn tips and tricks for more convenient viewing and what to do if your content fails to unblock. With a reliable solution, you’ll enjoy movies and TV shows that aren’t normally available here.
The best solution is to use a virtual private network (VPN). This service creates an encrypted connection between your device and the internet through a VPN server located in another geographic location, such as the US. All internet traffic is routed through this server, allowing you to change your virtual location and hide your real IP address along with your device’s current geographical location.
NordVPN clearly stands out in our list of TOP 10 best VPNs for Amazon Prime. The service is recognized for its high level of security, speed, rich feature set, and wide network of servers around the world.
How to bypass Amazon Prime Video geoblocking (quick guide)
-
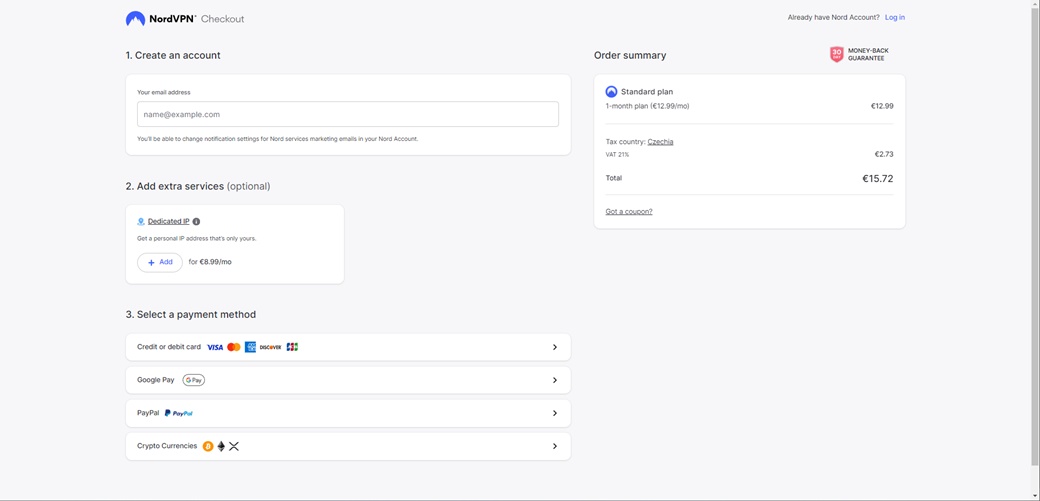
Step 1: Purchase NordVPN
You can quickly and easily subscribe to NordVPN on a monthly basis.
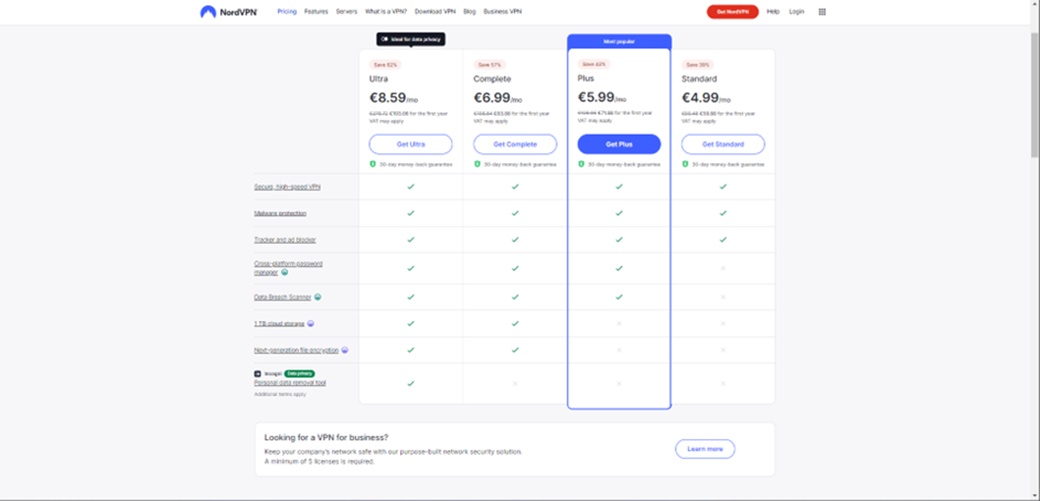
All available plans can be found at NordVPN. After selecting a plan, just enter your email address, it will be used later to log in to this service. You can then choose your preferred payment method, all of which come with a money-back guarantee for 30 days after purchase. We have verified this money-back guarantee ourselves.
-
Step 2: Installation and Download NordVPN
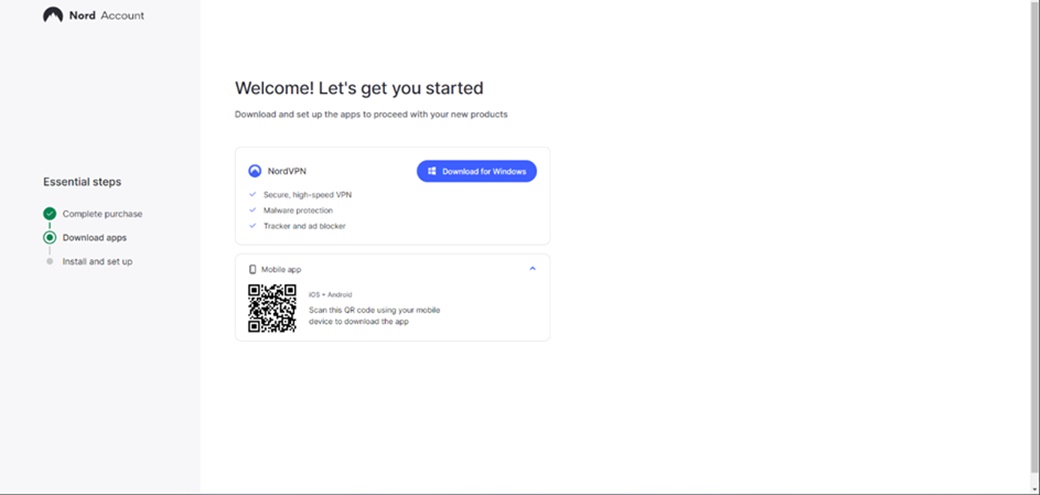
After successful subscription, NordVPN will automatically redirect you to a page where you can download the app to your device. If the automatic redirection did not happen, you can download the app manually. After clicking the “Download” button, the app will start downloading and once the download is complete, you can start the installation. During the installation process you will be able to select the location of the app, create an icon on your desktop and even add it to the Start menu if necessary.
-
Step 3: Create an account with NordVPN
Once you have the app installed and running, you must log in using the email you provided when you made the purchase in step one. After clicking the “Log in” button, you will be redirected to a page where you will enter your email. You will then receive a verification code to your email inbox, which you will enter in the appropriate field. After successful authentication you need to set a password for your account, then when you have completed all the steps you can launch the application.
-
Step 4: Connect to the NordVPN server
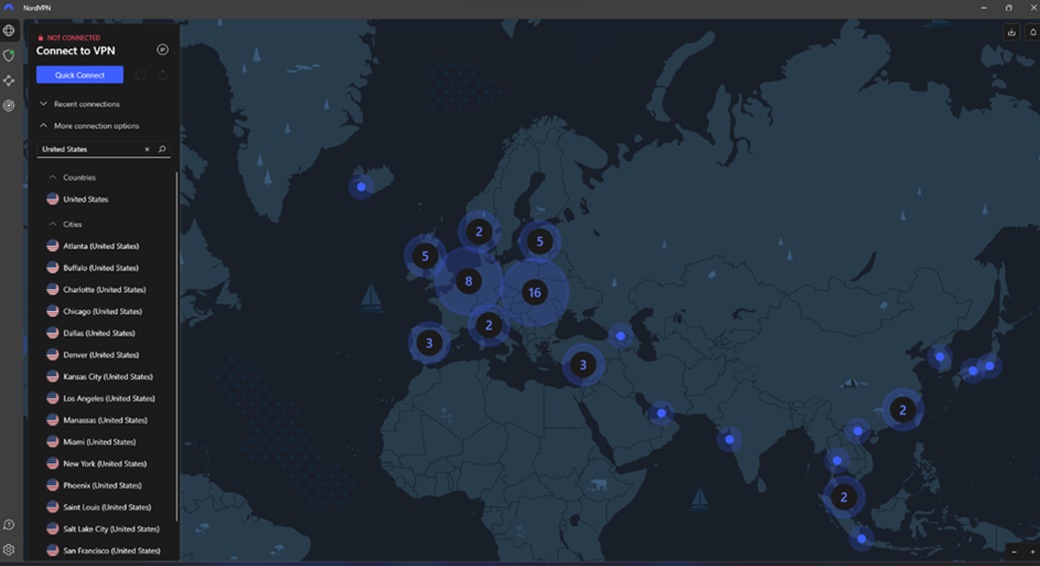
After creating your account, you have the NordVPN application running. Click “More connection options ” and type “United States ” in the search box to see the available servers in that country. After selecting a server either directly from the list or on the map, NordVPN will automatically connect you and your virtual location will change to the USA.
-
Step 5: Watch USA Amazon Prime with NordVPN
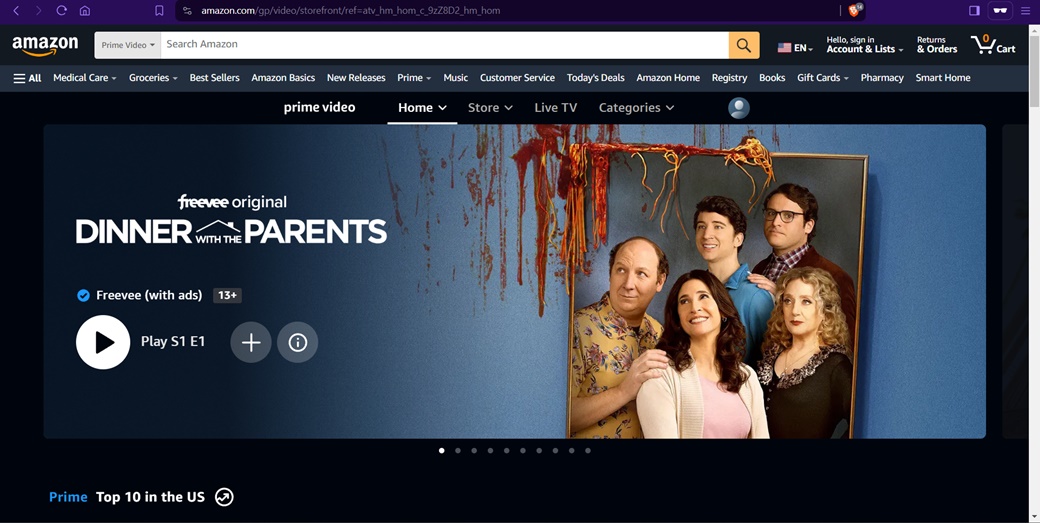
Now it’s time to launch Amazon Prime and watch unblocked US content. If you want to be sure that you have unblocked the content, you can check it. After logging into Amazon Prime and selecting your account, go to the “Home” category. Then scroll down the page, here you should find the “Top 10 in the US” section. If you see this section, it means that you have successfully unblocked content only available for the US.
Detailed instructions on how to unblock Amazon Prime Video
-
Subscription NordVPN
First, select the subscription option that best suits your needs on the NordVPN website.
The monthly plan offers you flexibility without the need for commitment, thanks to the payment every month, but at a higher price ($13.85).
A two-year subscription offers the lowest price ($4.04) but requires the longest commitment.
Once you’ve chosen your subscription length, you can choose between Ultra, Complete, Plus, and Standard packages. For unlocking US Amazon Prime, the Standard version will be amply sufficient.
After choosing your plan, enter your email address, this email address will be used for subsequent sign in and use NordVPN. You will then choose your preferred payment method, all of which are back guaranteed for a period of time (30 days) from purchase, even if you pay via cryptocurrency. We have verified the money-back guarantee for you ourselves.
-
Downloading the NordVPN app
After successful payment, NordVPN will automatically redirect you to a page where you can download the app installer file for your device. In case the automatic redirection did not occur, you can download the app via the link provided.
After pressing the “Download” button, you can select the location where the installation file will be saved on your device. However, it is not necessary to change the preset location.
Once you have selected a location to save the file, the download process will begin. Once the download is complete, open the downloaded file and start the application installation NordVPN.
-
Installing the NordVPN application
After downloading and running the application installation file, press the “Yes” button to allow the NordVPN application access to make changes on your device. This step is necessary for the app to function properly.
You will then see the installation process window where you can select the location of the app and files. If you want to keep the preset location, you can continue with the default settings and click “Next”.
After that, the installation preparation will be performed, during which the necessary files for the installation will be downloaded.
Next, you can choose to create an icon on the desktop and in the Start menu. These options are optional and can be customized to your preferences. Of course, you can also proceed again with the default settings from NordVPN. Then click on the “Next” button and continue with the installation process.
After clicking the “Install” button, the installation process will begin, during which the files will be placed in the correct locations, the configuration will be set, and other necessary tasks will be performed.
The goal of the installation is to allow the application to run and be used on your device.
Once the installation is complete, the application will immediately launch itself if you leave the “Launch NordVPN” option checked. Otherwise, you will have to open the application manually after clicking the “Finish” button. Leave the “Install Nordpass” option unselected. This program, the password manager, is not necessary to unblock US content on Amazon Prime, so click “Finish”.
-
Create the NordVPN account
Once the installation of NordVPN is complete, it’s time to launch the application. First, log into the application. Just click on the “Login” button, which will open your web browser.
Enter your registration email that you used during payment in the selected field in your web browser. After entering your email, click on the “Continue” button. You will receive a verification code in your e-mail, which you will then enter in the appropriate field.
After entering the verification code, you will be asked to create a password for your account. Enter your password and confirm it by clicking on the “Create password” button.
Once you have created your password, click on the “Continue” button to launch the application.
-
Application Preferences
Now that you have the NordVPN application running, you can leave the default settings from NordVPN to ensure a secure and reliable connection.
Auto-connect feature: If you don’t want the VPN to automatically turn on every time you connect to the internet, you can turn off the “Auto-connect” option. This gives you the ability to manually control when you want to use the VPN connection.
Kill Switch: We recommend that you leave this feature enabled. The Kill switch protects your device from revealing your true location and IP address in the event of a connection failure with the VPN server by automatically disconnecting your device from the internet.
Threat Protection: this feature provides protection similar to antivirus. This feature is not necessary for viewing content on Amazon Prime in the US, so you can turn it off.
After making or saving changes, click “Next” and then “Finish” to complete the app settings.
-
Connect to the NordVPN servers
In NordVPN, click “More connection options”, then navigate to the list of available servers. In this list, you can use the search box and type “United States” or simply scroll through the list of servers until you find the “United States” option. Another option is to also click directly on “United States” on the map.
Once you find a location in the US, click on it and you will be connected to it. Another option is to leave the server selection to the app NordVPN and just click on the “United States” option, which will automatically select the best server at that moment for you.
When you click on a specific location in the US, NordVPN will connect you to the selected server that is located in the US. Your virtual location is now in the US, allowing you to access content and services available only in that country.
-
Watch US content on Amazon Prime with NordVPN
As a next step, open Amazon Prime and verify that you have successfully unblocked content available only in the US. After logging into your account, navigate to the “Home” category to find the latest and most popular shows and movies.
Now comes the key moment. Scroll down the page and find the section marked “Top 10 in the US”. If you see this section, you can rejoice. Connecting using NordVPN has successfully helped you unblock content only available in the US.
Tips and Tricks
💻 Turn on the app and automatically connect via NordVPN at boot
If you want to watch US Amazon Prime content without having to manually launch the VPN app and connect to the servers manually, you can easily set the NordVPN app to launch automatically and connect you to US servers as soon as your device boots up.
Launch the NordVPN app and open its settings. In the “General” section, look for the option “Launch the app at Windows startup” and make sure that option is checked. This will ensure that the app is automatically turned on every time your device boots up.
You can also enable the “Launch the app minimized to system tray” option, which means the app will launch in minimized mode and won’t disturb you with its launch.
To automatically connect to the US when the app launches, go to the “Connection” section in the settings and enable the “Auto-connect” option. Then select “Custom” and click on the server selection. Find the “United States” option and confirm the selection. Be sure to check that “Auto-connect” is enabled.
With these simple settings changes, the NordVPN app will automatically start and connect to US servers when your device boots up, allowing you to watch US content on Amazon Prime with ease.
🧩 NordVPN browser extension
If you only want to use NordVPN within your browser, you can install the Chrome, Firefox or Edge extension.
After clicking the “Add” button for the selected extension, you will be redirected to the extension store for your browser. Here, simply install the extension using the “Add” button.
When you have finished installing the extension, you can open it in the top right corner of your browser or in the list of extensions. Once open, you will be prompted to log into your account NordVPN.
When you click the “Log in” button, you will be prompted to enter the email address you use for the NordVPN service. Then click “Continue” and fill in your password, which you will confirm by clicking “Log in”. You are now logged in and can start using the NordVPN extension in your browser.
If you have the NordVPN extension active, click on the US flag or search for “United States” in the list of available locations. This will connect you to servers in the USA and give you access to content available only in that country.
In the extension settings, you can activate automatic connection via VPN in your browser. Open the settings and go to the “Connection” tab. Here you will find the “Auto-connect” option. Once it is enabled, select the “United States” location. This setting will ensure that the NordVPN extension will automatically connect to the US server every time you start your browser.
📱 Watch US Amazon Prime from your mobile
If you’re interested in watching US Amazon Prime content on a mobile device as well, NordVPN will of course allow you to do so.
On the NordVPN website, select your platform (Android or iOS) and download the app from the appropriate app store. Once the download is complete, install the app on your mobile device.
Once you have the NordVPN app running, click on the text “Already have an account? Log in”. Enter the email you used to register with NordVPN and click “Continue”. Then enter your account password and click “Log in”.
Once you have successfully logged in, navigate to the NordVPN application and look for “United States” in the list of available locations. Click on the US flag and now NordVPN will connect you to the US server.
What to do if Amazon Prime detects VPN usage
1️⃣ Change the VPN server
Occasionally, Amazon Prime may block the IP address of one of the servers you’re connecting to. The solution is simple, just connect to a different server in the US.
In the NordVPN app, find “United States” in the list of available countries, then select the specific city you want to connect to, click on it to connect. Wait for the connection to successfully establish, then make sure you have your browser closed along with Amazon Prime. Once these steps are complete, relaunch Amazon Prime and you can watch US content.
2️⃣ Protocol Change
In the NordVPN app, go to settings, then change the “VPN protocol” in the “Conncetion” section. After changing the protocol, confirm the change and connect to the VPN server in the US. Make sure you are successfully connected to the VPN server with the new protocol. Restart your browser and Amazon Prime before watching Amazon Prime. If you’ve completed all the steps, it’s time to launch Amazon Prime and start watching content available in the US.
3️⃣ Contact NordVPN support
If you’re still having trouble connecting to Amazon Prime over a VPN connection, contact support. Visit NordVPN and click the chat icon in the bottom right corner to reach the support team. You can describe your problem here and the support team will provide you with immediate help and solutions. Alternatively, you can contact support via email at support@nordvpn.com.

